企业级使用LAMP源码安装教程 |
||||||
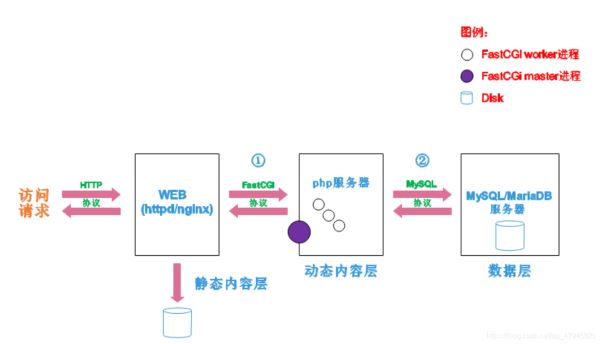
LAMP架构(同一台服务器上搭建) 1.lamp介绍lamp,由linux+apache+mysql/mariadb+php/perl/python的一组动态网站或者服务器的开源软件,除linux外其它各部分都是各种独立的程序,经常一起使用,拥有很强的兼容性,共同组成一个强大的web应用程序平台 。 Linux(操作系统),Apache(HTTP服务器),Mysql(mariadb,数据库软件),PHP(perl或python),建立web应用平台 2.web服务工作流程web服务器的资源分为俩种:静态和动态资源静态资源:静态内容,客户端从服务器获得的资源的表达形式与源文件相同 。就是直接储存于文件系统中的资源(.mp3/.mp4/.jpg/.gif) 动态资源:通常是程序文件,需要在服务器执行之后,将执行的结构返回给客户端(.php/.asp/.py/.net) web服务器如何处理客户端的请求
|
| 系统平台 | ip | 安装的服务 |
|---|---|---|
| centos/redhat | 192.168.136.145 | httpd-2.4/mysql-5.7/php/php-mysql |
httpd >mysql >php
注意php要求httpd使用prefock MPM安装统一采用lamp方式安装
#redhat源
[root@clq ']# cat /etc/yum.repos.d/CentOS-Stream-
CentOS-Stream-AppStream.repo         CentOS-Stream-HighAvailability.repo
CentOS-Stream-BaseOS.repo            CentOS-Stream-Media.repo
CentOS-Stream-Debuginfo.repo         CentOS-Stream-PowerTools.repo
CentOS-Stream-Extras.repo            CentOS-Stream-RealTime.repo
#安装epel源
[root@clq ']# yum -y install epel-release
#查看包组
[root@clq ']# yum grouplist
#安装包组
[root@clq ']# dnf -y groups mark install "Development Tools"
#创建apache用户
[root@clq ']# useradd -r -M -s /sbin/nologin apache
#安装依赖包(openssl-devel:加密传输模块)
[root@cb ']# yum -y install openssl-devel pcre-devel expat-devel libtool gcc gcc-c++ make
#下载安装apr和apr-util和httpd
[root@cb ']# cd /usr/src/
#利用wget下载三包 略
#tar解压包 略
#进入apr包进行修改
[root@cb apr-1.7.0]# vim configure
cfgfile="${ofile}T"
trap "$RM "$cfgfile";exit 1" 1 2 15
$RM "$cfgfile"    #此行删掉或注释
#apr编译三步
./configure --prefix=/usr/local/apr
make
make install
#apr-util编译三步
./configure --prefix=/usr/local/apr-util --with-apr=/usr/local/apr
make
make install
#httpd编译三步
./configure --prefix=/usr/local/apache
--sysconfdir=/etc/httpd24
--enable-so
--enable-ssl
--enable-cgi
--enable-rewrite
--with-zlib
--with-pcre
--with-apr=/usr/local/apr
--with-apr-util=/usr/local/apr-util/
--enable-modules=most
--enable-mpms-shared=all
--with-mpm=prefork
make
make install
#安装完配置
环境变量:echo 'export PATH=/usr/local/apache/bin:$PATH' > /etc/profile.d/apache.sh
读取:source /etc/profile.d/httpd.sh
头文件映射:ln -s /usr/local/apache/include /usr/include/httpd
帮助文档:vim /etc/man_db.conf
 22 MANDATORY_MANPATH                       /usr/local/share/man
 23 MANDATORY_MANPATH                       /usr/local/apache/man
#取消ServerName前面的注释(警告信息无关紧要)
[root@cb src]# vim /etc/httpd24/httpd.conf
ServerName
#启动apache
[root@cb src]# systemctl stop firewalld
[root@cb src]# systemctl disbles firewalld
[root@cb src]# /usr/local/apache/bin/apachectl start
[root@cb src]# ss -antl
State      Recv-Q     Send-Q         Local Address:Port           Peer Address:Port     Process
LISTEN     0          128                  0.0.0.0:22                  0.0.0.0:*
LISTEN     0          128                        *:80                        *:*
LISTEN     0          128                     [::]:22                     [::]:*
#注意删掉系统本身的apache
#编写service文件实现开机自启
#编写httpd.service文件:
vim /etc/systemd/system/httpd.service
文件内俩个具体的路径:
.配置文件路径:/etc/httpd24/httpd.conf
.程序文件路径:/usr/local/apache/bin/httpd
#系统加载文件:systemctl daemon-reload
#启动systemctl start httpd
#自启动systemctl enable httpd
[root@clq ']# vim /etc/systemd/system httpd.service
[root@clq system]# cat httpd.service
[Unit]
Description=Start httpd
[Service]
Type=simple
EnvironmentFile=/etc/httpd24/httpd.conf
ExecStart=/usr/local/apache/bin/httpd -k start -DFOREGROUND
ExecReload=/usr/local/apache/bin/httpd -k graceful
ExecStop=/bin/kill -WINCH ${MAINPID}
[Install]
WantedBy=multi-user.target
#安装依赖包(cmake:编译自动配置工具)
dnf -y install ncurses-devel openssl-devel openssl cmake mariadb-devel
#创建用户
useradd -r -M -s /sbin/nologin mysql
#下载mysql5.7.31包
#解压放到/usr/local下
#改名字方便操作
cd /usr/local
mv mysql5.7.31 mysql
#改属主
chown -R mysql.mysql mysql/
#环境变量
echo 'export PATH=/usr/local/mysql/bin:$PATH' > /etc/profile.d/mysql.sh
source /etc/profile.d/mysql.sh
#头文件映射
ln -s /usr/local/mysql/include /usr/include/mysql
#库文件
vim /etc/ld.so.conf.d/mysql.conf
/usr/local/mysql/lib
ldconfig       #重新读取一下
#帮助文档
vim /etc/man_db.conf
 23 MANDATORY_MANPATH                       /usr/local/apache/man
 24 MANDATORY_MANPATH                       /usr/local/mysql/man
#创建数据目录
mkdir /opt/data
chown -R mysql.mysql /opt/data
#初始化
mysqld --initialize --user=mysql --datadir=/opt/data
#编写配置文件
cat >/etc/my.cnf <<EOF
[mysqld]
basedir = /usr/local/mysql #安装目录
datadir = /opt/data        #数据目录
socket = /tmp/mysql.sock   #套接字
user = mysql			  #用户
port = 3306				  #端口号
pid-file = /opt/data/mysql.pid #进程号文件
skip-name-resolve          #跳过域名解析
EOF						退出
#编写脚本
cp /usr/local/mysql/support-files/mysql.server /etc/init.d/mysqld
vim /etc/init.d/mysqld
datadir=/opt/data
basedir=/usr/local/mysql
#启动mysql
service mysqld start
ss -antl
#安装libncurses.so.5包
yum whatprovides libncurses.so.5
yum -y install ncurses-compat-libs
#修改mysql密码
set password=password('Centos8.0!')
#确保开机自启
chkconfig --add mysqld
chkconfig mysqld on
chkconfig --list
#centos8可yum安装php,php是一门语言,安装7.2版本以上即可
yum -y install php*
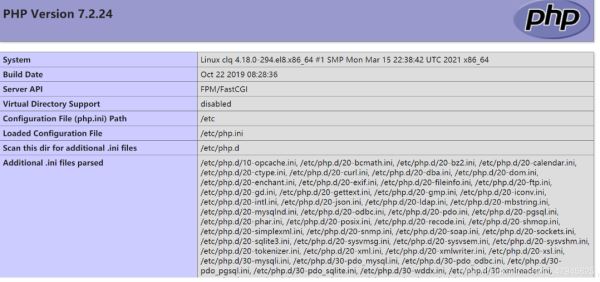
#php配置
vim /etc/php-fpm.d/www.conf
38	;listen = /run/php-fpm/www.sock   #取消注释
39	listen = 127.0.0.1:9000           #添加此行
65	listen.allowed_clients = 127.0.0.1
mkdir -p /data/php            #创建php目录
chown -R apache.apache /data/ #改变属主
vim /data/php/index.php       #编写index.php文件
<?php
	phpinfo();
?>
#重新启动systemctl restart php-fpm.service
centos8之前版本
//配置yum源
[root@localhost ']# wget http://rpms.remirepo.net/enterprise/remi-release-7.rpm
[root@localhost ']# rpm -Uvh remi-release-7.rpm
[root@localhost ']# yum makecache --enablerepo=remi-php74
//安装依赖包
[root@localhost ']# yum -y install libxml2 libxml2-devel openssl openssl-devel bzip2 bzip2-devel libcurl libcurl-devel libicu-devel libjpeg libjpeg-devel libpng libpng-devel openldap-devel  pcre-devel freetype freetype-devel gmp gmp-devel libmcrypt libmcrypt-devel readline readline-devel libxslt libxslt-devel mhash mhash-devel php72-php-mysqlnd
安装过程略....
//下载php
[root@localhost ']# cd /usr/src/
[root@localhost src]# wget http://cn.php.net/distributions/php-7.2.8.tar.xz
下载过程略....
//编译安装php
[root@localhost src]# tar xf php-7.2.8.tar.xz
[root@localhost src]# cd php-7.2.8
[root@localhost php-7.2.8]# ./configure --prefix=/usr/local/php7
--with-config-file-path=/etc
--enable-fpm
--enable-inline-optimization
--disable-debug
--disable-rpath
--enable-shared
--enable-soap
--with-openssl
--enable-bcmath
--with-iconv
--with-bz2
--enable-calendar
--with-curl
--enable-exif
--enable-ftp
--with-gd
--with-jpeg-dir
--with-png-dir
--with-zlib-dir
--with-freetype-dir
--with-gettext
--enable-json
--enable-mbstring
--enable-pdo
--with-mysqli=mysqlnd
--with-pdo-mysql=mysqlnd
--with-readline
--enable-shmop
--enable-simplexml
--enable-sockets
--enable-zip
--enable-mysqlnd-compression-support
--with-pear
--enable-pcntl
--enable-posix
[root@localhost php-7.2.8]# make -j $(cat /proc/cpuinfo |grep processor|wc -l)
编译过程略
[root@localhost php-7.2.8]# make install
安装过程略
//安装后配置
[root@localhost ']# echo 'export PATH=/usr/local/php7/bin:$PATH' > /etc/profile.d/php7.sh
[root@localhost ']# source /etc/profile.d/php7.sh
//安装后配置
[root@localhost ']# echo 'export PATH=/usr/local/php7/bin:$PATH' > /etc/profile.d/php7.sh
[root@localhost ']# source /etc/profile.d/php7.sh
[root@localhost php-7.2.8]# which php
/usr/local/php7/bin/php
[root@localhost php-7.2.8]# php -v
PHP 7.2.8 (cli) (built: Aug 16 2018 13:27:30) ( NTS )
Copyright (c) 1997-2018 The PHP Group
Zend Engine v3.2.0, Copyright (c) 1998-2018 Zend Technologies
//配置php-fpm
[root@localhost php-7.2.8]# cp php.ini-production /etc/php.ini
[root@localhost php-7.2.8]# cp sapi/fpm/init.d.php-fpm /etc/init.d/php-fpm
[root@localhost php-7.2.8]# chmod +x /etc/rc.d/init.d/php-fpm
[root@localhost php-7.2.8]# cp /usr/local/php7/etc/php-fpm.conf.default /usr/local/php7/etc/php-fpm.conf
[root@localhost php-7.2.8]# cp /usr/local/php7/etc/php-fpm.d/www.conf.default /usr/local/php7/etc/php-fpm.d/www.conf
//编辑php-fpm的配置文件(/usr/local/php7/etc/php-fpm.conf):
//配置fpm的相关选项为你所需要的值:
[root@localhost ']# vim /usr/local/php7/etc/php-fpm.conf
.....
.....
pm.max_children = 50    ;最多同时提供50个进程提供50个并发服务
pm.start_servers = 5    ;启动时启动5个进程
pm.min_spare_servers = 2    ;最小空闲进程数
pm.max_spare_servers = 8    ;最大空闲进程数
[root@localhost ']# tail /usr/local/php7/etc/php-fpm.conf
; file.
; Relative path can also be used. They will be prefixed by:
;  - the global prefix if it's been set (-p argument)
;  - /usr/local/php7 otherwise
include=/usr/local/php7/etc/php-fpm.d/*.conf
pm.max_children = 50
pm.start_servers = 5
pm.min_spare_servers = 2
pm.max_spare_servers = 8
//启动php-fpm
[root@localhost ']# service php-fpm start
Starting php-fpm  done
//默认情况下,fpm监听在127.0.0.1的9000端口,也可以使用如下命令验证其是否已经监听在相应的套接字
[root@localhost ']# ss -antl
State      Recv-Q Send-Q           Local Address:Port                          Peer Address:Port
LISTEN     0      128                          *:22                                       *:*
LISTEN     0      100                  127.0.0.1:25                                       *:*
LISTEN     0      128                  127.0.0.1:9000                                     *:*
LISTEN     0      128                         :::80                                      :::*
LISTEN     0      128                         :::22                                      :::*
LISTEN     0      100                        ::1:25                                      :::*
LISTEN     0      80                          :::3306                                    :::*
[root@localhost ']# ps -ef|grep php
root      81070      1  0 14:13 ?        00:00:00 php-fpm: master process (/usr/local/php7/etc/php-fpm.conf)
nobody    81071  81070  0 14:13 ?        00:00:00 php-fpm: pool www
nobody    81072  81070  0 14:13 ?        00:00:00 php-fpm: pool www
nobody    81073  81070  0 14:13 ?        00:00:00 php-fpm: pool www
nobody    81074  81070  0 14:13 ?        00:00:00 php-fpm: pool www
nobody    81075  81070  0 14:13 ?        00:00:00 php-fpm: pool www
root      81079  83354  0 14:15 pts/1    00:00:00 grep --color=auto php
apache 2.4以后有一个针对FastCGI的实现,模块为mod_proxy_fcgi.so,它其实是作为mod_proxy.so模块的扩展,因此,这俩个模块都要加载,编辑httpd.conf文件,取消两行注释
vim /etc/httpd24/httpd.conf
LoadModule proxy_module modules/mod_proxy.so
LoadModule proxy_fcgi_module modules/mod_proxy_fcgi.so
或者sed修改
sed -i '/proxy_module/s/#//g' /etc/httpd24/httpd.conf
sed -i '/proxy_fcgi_module/s/#//g' /etc/httpd24/httpd.conf
apache yum安装网页的文件路径:/var/www/html
apache 源码安装网页的文件路径:/usr/local/apache/htdocs
配置虚拟主机
在需要使用fcgi的虚拟主机添加俩行:
ProxyRequests Off #关闭正向代理 ProxyPassMatch ^/(.*.php)$ fcgi://127.0.0.1:9000/网页目录/redhat.com/$1 #以上设置是表示把.php结尾的文件发送到php-fpm进程,php-fpm至少需要知道运行的目录和URL,fcgi后面指名了这俩个参数,其它参数被mod――proxy_fcgi.so进行了封装,不需要手动指定 。 #redhat是域名 #$1表示匹配所有以.php结尾的httpd请求
/etc/httpd24/httpd.conf  #主配置文件
[root@clq ] vim /etc/httpd24/httpd.conf   #进入主配置文件添加一个虚拟主机配置文件
[root@clq ]vim /etc/httpd24/extra/vhosts.conf   #编辑虚拟主机配置文件
<VirtualHost *:80>
	DocumentRoot "/data/php/"       #文件存放路径
	ServerName www.clq.com         #域名
	DirectoryIndex index.php
	ProxyRequests Off
	ProxyPassMatch ^/(.*.php)$ fcgi://127.0.0.1:9000/data/php/$1
	<Directory "/data/php/">
		Options none
		AllowOverride none
		Require all granted
	</Directory>
</VirtualHost>
[root@clq] vim /etc/httpd24/httpd.conf
203 ServerName 0.0.0.0.com:80                #修改
261 DirectoryIndex  index.php index.html       #中间加index.php
399 AddType application/x-httpd-php .php         #添加此行
400 AddType application/x-httpd-php-source .phps #添加此行
488 #
489 Include /etc/httpd24/httpd/extra/vhosts.conf   #添加此条
#重启
systemctl restart httpd
下载地址:https://wordpress.org/download/#download-install
#解压该包
[root@clq ']# unzip wordpress-5.7.2.zip
#解压的包全部放到/data/php下
[root@clq ']# mv wordpress/* /data/php/
再次访问:
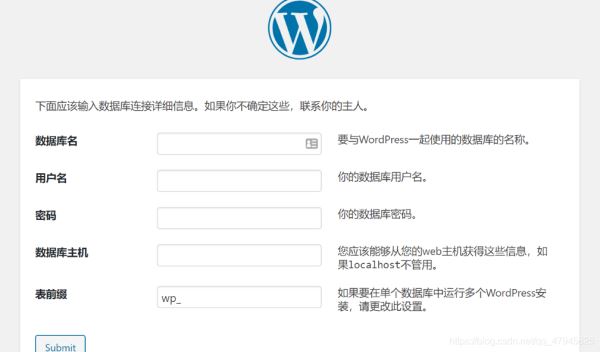
#数据库权限
mysql> grant all on *.* to root@'192.168.136.219' identified by 'huawei@123';
Query OK, 0 rows affected, 1 warning (0.00 sec)
mysql> flush privileges;
Query OK, 0 rows affected (0.00 sec)
#创建数据库wordpress
mysql> create database wordpress;
以上就是企业使用LAMP源码安装教程的详细内容,更多关于企业用LAMP源码安装的资料请关注脚本之家其它相关文章!