����������ѵ�� >> ��̿��� >> ASPNET
.NET������ʶ�����ʵ��ʾ�� |
|
�����ֳ����������š���ѩ�������ֳ����������ܿ�������Ӱʦ������Ƭ������Щ��Ӫ�߷����һ���¾�����Ƭ̫���ˣ��ͻ��ڳ�ǧ��������Ƭ���ҵ��Լ��ɲ��Ǽ������� ����һ������Ȼ���ͥ�ۻ�Ҳͬ����̫������Ƭ������ѡʮ������ �� ������ ���Ľ�ʹ�� fa3a7bfd807ccd6b17cf559ad584cbaa ʹ�÷��� ���Ȱ�װ
string key = "fa3a7bfd807ccd6b17cf559ad584cbaa"; // �滻Ϊ���key
using var fc = new FaceClient(new ApiKeyServiceClientCredentials(key))
{
Endpoint = "https://southeastasia.api.cognitive.microsoft.com",
};
Ȼ��ʶ��һ����Ƭ�� using var file = File.OpenRead(@"C:PhotosDSC_996ICU.JPG"); IList<DetectedFace> faces = await fc.Face.DetectWithStreamAsync(file); ���з��ص�
[
  {
   "FaceId": "9997b64e-6e62-4424-88b5-f4780d3767c6",
   "RecognitionModel": null,
   "FaceRectangle": {
    "Width": 174,
    "Height": 174,
    "Left": 62,
    "Top": 559
   },
   "FaceLandmarks": null,
   "FaceAttributes": null
  },
  {
   "FaceId": "8793b251-8cc8-45c5-ab68-e7c9064c4cfd",
   "RecognitionModel": null,
   "FaceRectangle": {
    "Width": 152,
    "Height": 152,
    "Left": 775,
    "Top": 580
   },
   "FaceLandmarks": null,
   "FaceAttributes": null
  }
 ]
�ɼ�������Ƭ����������
���ͨ�� var faceIds = faces.Select(x => x.FaceId.Value).ToList(); GroupResult reslut = await fc.Face.GroupAsync(faceIds); ������һ��
public class GroupResult
{
  public IList<IList<Guid>> Groups
  {
    get;
    set;
  }

  public IList<Guid> MessyGroup
  {
    get;
    set;
  }

  // ...
}
������һ�� ����������Ϳ���ͨ��һС�μ�̵Ĵ��룬����ͬ�������飬�ֱ��ƶ�Ӧ���ļ����У�
void CopyGroup(string outputPath, GroupResult result, Dictionary<Guid, (string file, DetectedFace face)> faces)
{
  foreach (var item in result.Groups
    .SelectMany((group, index) => group.Select(v => (faceId: v, index)))
    .Select(x => (info: faces[x.faceId], i: x.index + 1)).Dump())
  {
    string dir = Path.Combine(outputPath, item.i.ToString());
    Directory.CreateDirectory(dir);
    File.Copy(item.info.file, Path.Combine(dir, Path.GetFileName(item.info.file)), overwrite: true);
  }

  string messyFolder = Path.Combine(outputPath, "messy");
  Directory.CreateDirectory(messyFolder);
  foreach (var file in result.MessyGroup.Select(x => faces[x].file).Distinct())
  {
    File.Copy(file, Path.Combine(messyFolder, Path.GetFileName(file)), overwrite: true);
  }
}
Ȼ����ܵõ����н������ͼ���Ҵ�����
������ʲô���⣿ ������ ͼƬ̫����Ҫѹ�� �Ͼ�Ҫ��ͼƬ�ϴ����Ʒ����У�����ϴ����ٲ��ѣ�������ͦ�������ڵ��ֻ������������������ɴﵽ�ü�ǧ�����أ� ����������ʵ
��ˣ����ͼƬ̫�������һ����ѹ������Ȼ���ͼƬ̫С����ȻҲû��Ҫ����ѹ���ˣ���ʹ��
byte[] CompressImage(string image, int edgeLimit = 1920)
{
  using var bmp = Bitmap.FromFile(image);

  using var resized = (1.0 * Math.Max(bmp.Width, bmp.Height) / edgeLimit) switch
  {
    var x when x > 1 => new Bitmap(bmp, new Size((int)(bmp.Size.Width / x), (int)(bmp.Size.Height / x))),
    _ => bmp,
  };

  using var ms = new MemoryStream();
  resized.Save(ms, ImageFormat.Jpeg);
  return ms.ToArray();
}
��������Ƭ ���һ�㶼��
������Ƭ��������ᱣ��
void HandleOrientation(Image image, PropertyItem[] propertyItems)
{
  const int exifOrientationId = 0x112;
  PropertyItem orientationProp = propertyItems.FirstOrDefault(i => i.Id == exifOrientationId);

  if (orientationProp == null) return;

  int val = BitConverter.ToUInt16(orientationProp.Value, 0);
  RotateFlipType rotateFlipType = val switch
  {
    2 => RotateFlipType.RotateNoneFlipX,
    3 => RotateFlipType.Rotate180FlipNone,
    4 => RotateFlipType.Rotate180FlipX,
    5 => RotateFlipType.Rotate90FlipX,
    6 => RotateFlipType.Rotate90FlipNone,
    7 => RotateFlipType.Rotate270FlipX,
    8 => RotateFlipType.Rotate270FlipNone,
    _ => RotateFlipType.RotateNoneFlipNone,
  };

  if (rotateFlipType != RotateFlipType.RotateNoneFlipNone)
  {
    image.RotateFlip(rotateFlipType);
  }
}
��ת���ҵ���Ƭ���£�
�������ĵ���ƬҲ��ʶ������� �� �����ٶ� ǰ��˵����һ���ļ��п��ܻ��г�ǧ������ļ���һ�����ϴ�ʶ���ٶȿ������˵㣬���Ĵ�����ܳ�������ӣ�
Dictionary<Guid, (string file, DetectedFace face)> faces = GetFiles(inFolder)
 .Select(file =>
 {
  byte[] bytes = CompressImage(file);
  var result = (file, faces: fc.Face.DetectWithStreamAsync(new MemoryStream(bytes)).GetAwaiter().GetResult());
  (result.faces.Count == 0 ? $"{file} not detect any face!!!" : $"{file} detected {result.faces.Count}.").Dump();
  return (file, faces: result.faces.ToList());
 })
 .SelectMany(x => x.faces.Select(face => (x.file, face)))
 .ToDictionary(x => x.face.FaceId.Value, x => (file: x.file, face: x.face));
Ҫ����ٶȱ仯���������ò����ϴ�������
Dictionary<Guid, (string file, DetectedFace face)> faces = GetFiles(inFolder)
.AsParallel() // �ӵľ������д���
.Select(file =>
{
byte[] bytes = CompressImage(file);
var result = (file, faces: fc.Face.DetectWithStreamAsync(new MemoryStream(bytes)).GetAwaiter().GetResult());
(result.faces.Count == 0 ? $"{file} not detect any face!!!" : $"{file} detected {result.faces.Count}.").Dump();
return (file, faces: result.faces.ToList());
})
.SelectMany(x => x.faces.Select(face => (x.file, face)))
.ToDictionary(x => x.face.FaceId.Value, x => (file: x.file, face: x.face));
�ϵ����� Ҳ��������˵���г�ǧ��������Ƭ�����һ�����紫���쳣�����ߴ��������ϵĿ��ȣ�˭֪���أ�������������ȫһ��������ֻ��������һЩ�����ķ��������ж�����Ҫ���¿�ʼ �����ǿ��Լ��������г�˵�ġ��ϵ����������� �� ��ʵ����һ�����棬��¼ÿ���ļ���ȡ�Ľ����Ȼ���´�����ʱ�ȴӻ����ж�ȡ���ɣ����浽һ��
Dictionary<Guid, (string file, DetectedFace face)> faces = GetFiles(inFolder)
.AsParallel() // �ӵľ������д���
.Select(file =>
{
byte[] bytes = CompressImage(file);
var result = (file, faces: fc.Face.DetectWithStreamAsync(new MemoryStream(bytes)).GetAwaiter().GetResult());
(result.faces.Count == 0 ? $"{file} not detect any face!!!" : $"{file} detected {result.faces.Count}.").Dump();
return (file, faces: result.faces.ToList());
})
.SelectMany(x => x.faces.Select(face => (x.file, face)))
.ToDictionary(x => x.face.FaceId.Value, x => (file: x.file, face: x.face));
ע������·���һ�� ʹ��ʱ��ֻ��ֻ����
var cache = new Cache<List<DetectedFace>>(); // �ص�
Dictionary<Guid, (string file, DetectedFace face)> faces = GetFiles(inFolder)
.AsParallel()
.Select(file => (file: file, faces: cache.GetOrCreate(file, () => // �ص�
{
byte[] bytes = CompressImage(file);
var result = (file, faces: fc.Face.DetectWithStreamAsync(new MemoryStream(bytes)).GetAwaiter().GetResult());
(result.faces.Count == 0 ? $"{file} not detect any face!!!" : $"{file} detected {result.faces.Count}.").Dump();
return result.faces.ToList();
})))
.SelectMany(x => x.faces.Select(face => (x.file, face)))
.ToDictionary(x => x.face.FaceId.Value, x => (file: x.file, face: x.face));
������������ ��Ƭ̫�࣬�����ܴ��ߺ�Ӱ���кü�ʮ���ˣ��ֳ������飬����������ӣ�
��ȫ��֪���Լ��������ģ������Ҫ�������������� �� ע��������Ĺ��̣�Ҳ���м��ɣ�����һ�£��ϴ�ʱ����Ƭ��������ѹ������ת���ģ���˷��ص�
using var bmp = Bitmap.FromFile(item.info.file);
HandleOrientation(bmp, bmp.PropertyItems);
using (var g = Graphics.FromImage(bmp))
{
 using var brush = new SolidBrush(Color.Red);
 using var pen = new Pen(brush, 5.0f);
 var rect = item.info.face.FaceRectangle;
 float scale = Math.Max(1.0f, (float)(1.0 * Math.Max(bmp.Width, bmp.Height) / 1920.0));
 g.ScaleTransform(scale, scale);
 g.DrawRectangle(pen, new Rectangle(rect.Left, rect.Top, rect.Width, rect.Height));
}
bmp.Save(Path.Combine(dir, Path.GetFileName(item.info.file)));
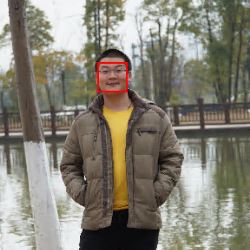
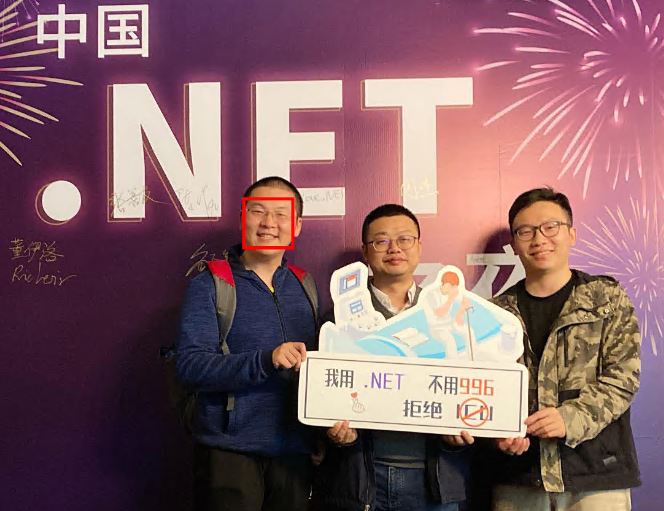
ʹ���������������Ƭ����������£��е�������Խ�ʱ����ʶ��ĸо�����
1000����������
������ķ���������ʹ�� ������ʹ�õ���
foreach (var buffer in faces
 .Buffer(1000)
 .Select((list, groupId) => (list, groupId))
{
 GroupResult group = await fc.Face.GroupAsync(buffer.list.Select(x => x.Key).ToList());
 var folder = outFolder + @"gid-" + buffer.groupId;
 CopyGroup(folder, group, faces);
}
�ܽ� �����õ����������룬ȫ���ϴ��˵��ҵIJ������� ������Ҳμ����Ϻ���
�ܵ���˵�����Ч����ͦ�����������ֱ��ʵ���Ƭ�����������ҵ���😂 �� ע�⣬��һ���ǵ��� ���⣬������������ʶ������ ���Ͼ��DZ��ĵ�ȫ�����ݣ�ϣ���Դ�ҵ�ѧϰ����������Ҳϣ����Ҷ��֧�ֽű�֮�� �� |